Redis-整合SpringBoot

SpringBoot整合Redis

在SpringBoot2.x之后,底层已经不再使用jedis操作Redis了,而是lettuce

jedis:采用的直连,如果有多个线程操作的话,是不安全的,需要使用jedis pool连接池来解决问题(BIO模式)

lettcue:采用netty,实例可以在多个实例中共享,不存在线程不安全的问题(Dubbo底层也用到了它)(NIO模式)

如何使用

1、导入依赖

1
2
3
4
5
<dependency>
<groupId>org.springframework.boot</groupId>
<artifactId>spring-boot-starter-data-redis</artifactId>
<version>2.6.3</version>
</dependency>

2、观察RedisAutoConfiguration源码

1
2
3
4
5
6
7
8
9
10
11
12
13
14
15
16
17
18
19
20
21
22
23
24
25
26
27
28
29
30
@Configuration(
proxyBeanMethods = false
)
@ConditionalOnClass({RedisOperations.class})
@EnableConfigurationProperties({RedisProperties.class})
@Import({LettuceConnectionConfiguration.class, JedisConnectionConfiguration.class})
public class RedisAutoConfiguration {
public RedisAutoConfiguration() {
}

@Bean
// 这说明我们可以自定义template
@ConditionalOnMissingBean(
name = {"redisTemplate"}
)
@ConditionalOnSingleCandidate(RedisConnectionFactory.class)
public RedisTemplate<Object, Object> redisTemplate(RedisConnectionFactory redisConnectionFactory) {
RedisTemplate<Object, Object> template = new RedisTemplate();
template.setConnectionFactory(redisConnectionFactory);
return template;
}

@Bean
// 因为我们平时使用string会非常多,所以内置了一个StringRedisTemplate
@ConditionalOnMissingBean
@ConditionalOnSingleCandidate(RedisConnectionFactory.class)
public StringRedisTemplate stringRedisTemplate(RedisConnectionFactory redisConnectionFactory) {
return new StringRedisTemplate(redisConnectionFactory);
}
}

3、配置连接,看源码可以发现,就算我们不配置,springboot也默认可以连接本地的redis
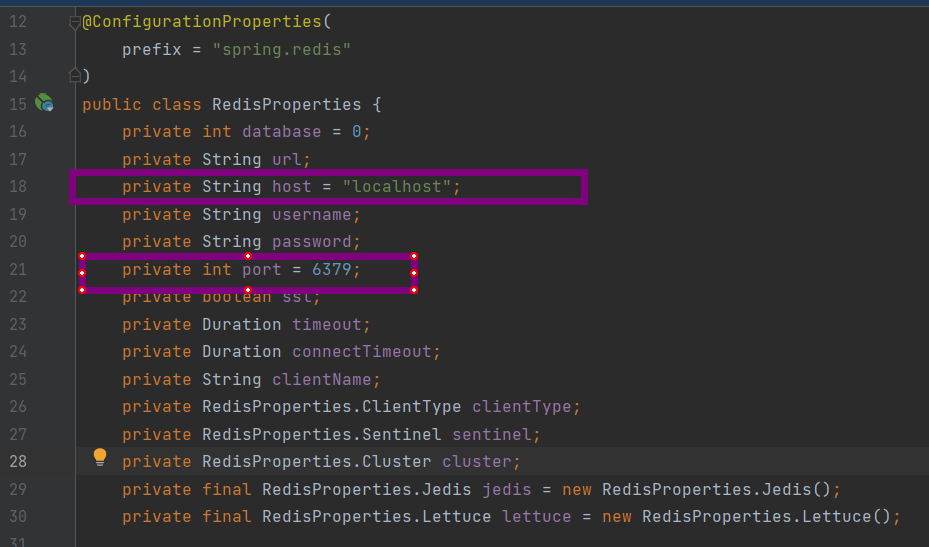
4、测试

先打开命令行客户端查看全部的key

1
2
127.0.0.1:6379> keys *
(empty list or set)

测试类测试

1
2
3
4
5
6
7
8
9
10
11
12
@SpringBootTest
class SpringbootRedisApplicationTests {
@Autowired
private StringRedisTemplate redisTemplate;
@Test
void contextLoads() {
RedisConnection connection = redisTemplate.getConnectionFactory().getConnection();
connection.flushAll();
connection.flushDb();
redisTemplate.opsForValue().set("springboot integrated Redis","success");
}
}

命令行客户端查看全部的key,可以发现数据成功插入了

1
2
127.0.0.1:6379> keys *
1) "springboot integrated Redis"

序列化器

先看下源码

如果我们没有自定义这些序列化,那么他们都会被设置为内置的defaultSerializer,那么这种jdk的序列化会使我们的中文转义,这时候我们需要使用JSON来实现序列化

1
2
3
if (this.defaultSerializer == null) {
this.defaultSerializer = new JdkSerializationRedisSerializer(this.classLoader != null ? this.classLoader : this.getClass().getClassLoader());
}

下面我们直接上案例:

使用jdk内置序列化器

User

1
2
3
4
5
6
7
@Data
@NoArgsConstructor
@AllArgsConstructor
public class User {
private String name;
private int age;
}

直接测试将对象写入

1
2
3
4
5
6
7
8
@Test
void testSerialization(){
User user = new User();
user.setName("zhima");
user.setAge(19);
redisTemplate.opsForValue().set("user", user);
System.out.println(redisTemplate.opsForValue().get("user"));
}

执行发现报错了,这就想到了我们从源码中看到的JdkSerializationRedisSerializer,如果我们没有配置自己想要的序列化器,那么就默认为此序列化器,所以知道报这个错误的原因是user没有实现序列化接口,那我们来实现以下序列化接口

1
org.springframework.data.redis.serializer.SerializationException: Cannot serialize; nested exception is org.springframework.core.serializer.support.SerializationFailedException: Failed to serialize object using DefaultSerializer; nested exception is java.lang.IllegalArgumentException: DefaultSerializer requires a Serializable payload but received an object of type [com.lizhi.springbootredis.pojo.User]

这时候再执行,看控制台

1
User(name=zhima, age=19)

自定义序列化器

配置自定义redisTemplate

1
2
3
4
5
6
7
8
9
10
11
12
13
14
15
16
17
18
19
20
21
@Bean("myRedisTemplate")
public RedisTemplate<String, Object> redisTemplate(RedisConnectionFactory redisConnectionFactory){
RedisTemplate<String, Object> template = new RedisTemplate();
template.setConnectionFactory(redisConnectionFactory);
Jackson2JsonRedisSerializer<Object> objectJackson2JsonRedisSerializer = new Jackson2JsonRedisSerializer<>(Object.class);
StringRedisSerializer stringRedisSerializer = new StringRedisSerializer();
ObjectMapper om = new ObjectMapper();
om.setVisibility(PropertyAccessor.ALL, JsonAutoDetect.Visibility.ANY);
om.enableDefaultTyping(ObjectMapper.DefaultTyping.NON_FINAL);
objectJackson2JsonRedisSerializer.setObjectMapper(om);
// hash的value使用JSON序列化
template.setHashValueSerializer(objectJackson2JsonRedisSerializer);
// value使用JSON序列化
template.setValueSerializer(objectJackson2JsonRedisSerializer);
// hash表的key使用string的序列化器
template.setHashKeySerializer(stringRedisSerializer);
// key采用string的序列化器
template.setKeySerializer(stringRedisSerializer);
template.afterPropertiesSet();
return template;
}

再执行刚刚的测试,就会发现,命令行中的key已经是一个正常的字符串了

工具类RedisUtils

这样使用原生的API太麻烦了,我们可以自己编写一个工具类。

1
2
链接:https://pan.baidu.com/s/1CZG5D8QUsz1NnqBjXZf0tg 
提取码:24m2
给作者买杯咖啡吧~~~