Vue2-基础4

Vue2基础4

修改默认配置

通过vue inspect > output.js可以查看Vue脚手架的默认配置

创建vue.config.js

可选配置项可以去官网查看

1
2
3
4
5
6
7
8
9
module.exports = {
pages: {
index: {
// page 的入口
entry: 'src/main.js'
}
},
lintOnSave: false
}

ref属性

1
2
3
4
5
6
7
8
9
10
11
12
13
14
15
16
17
18
19
20
21
<template>
<div>
<button ref="btn" @click="showDOM">点我输出按钮的DOM元素和School的Vc对象</button>
<School ref="sch"/>
</div>
</template>

<script>
import School from './components/School'

export default {
name:'App',
components:{School},
methods: {
showDOM(){
console.log(this.$refs.btn) //真实DOM元素
console.log(this.$refs.sch) //School组件的实例对象(vc)
}
}
}
</script>

被用来给元素或子组件注册引用信息(id的替代者)

应用在html标签上获取的是真实DOM元素

应用在组件标签上是组件实例对象(vc)

props配置项

父组件想给子组件传数据,即可通过props配置项来实现

Student.vue

1
2
3
4
5
6
7
8
9
10
11
12
13
14
15
<template>
<div>
<h2>学生姓名:{{name}}</h2>
<h2>学生性别:{{sex}}</h2>
<h2>学生年龄:{{age}}</h2>
</div>
</template>

<script>
export default {
name:'Student',
//简单声明接收
props:['name','age','sex']
}
</script>

使用该组件

1
<School name='zs' age=18 sex='男'/>

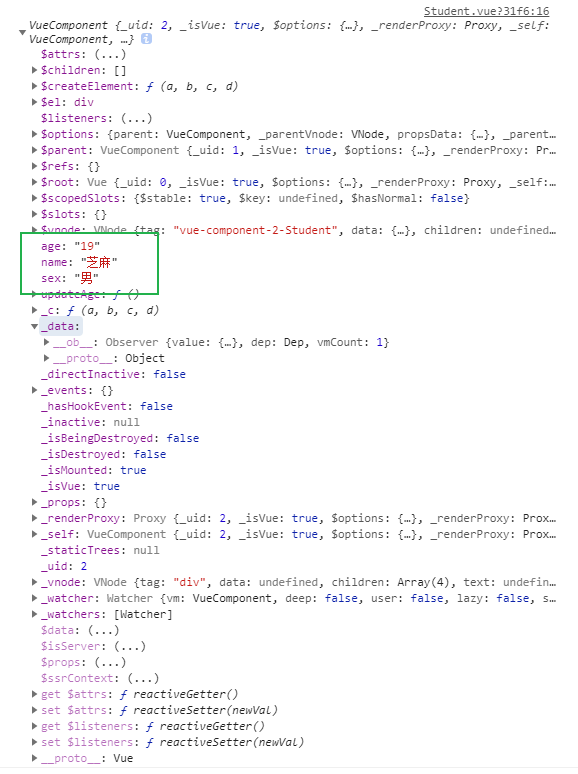
我们来观察一下props接收到的数据放在了哪里

可以看到,使用props接收到的数据都被放在了vc对象上

我们还发现_data中并没有这些数据

props接收的数据不可修改

1
<button @click="updateAge">尝试修改收到的年龄</button>
1
2
3
4
5
methods: {
updateAge(){
this.age++
}
}

如果一定想修改,则需要使用data配置一下数据做个中转

并且展示的时候也使用data中中转的那个变量

1
<h2>学生年龄:{{myAge}}</h2>
1
2
3
4
5
data(){
return {
myAge: this.age
}
}

接收的同时对数据进行类型限制

如果要对类型做限制,需要通过以下写法

1
2
3
4
5
props:{
name:String,
age:Number,
sex:String
}

传入数据

1
<Student name="芝麻" :age="19" sex="男"/>

如果是这样传入的

1
<Student name="芝麻" age="19" sex="男"/>

接收的同时对数据:进行类型限制+默认值的指定+必要性的限制

1
2
3
4
5
6
7
8
9
10
11
12
13
14
props:{
name:{
type:String, //name的类型是字符串
required:true, //必要的,父亲组件一定要传该数据
},
age:{
type:Number,
default:99 //默认值
},
sex:{
type:String,
required:true
}
}

mixin混入

就是子组件可以共享mixin中配置的配置项

达到全局共享的效果,达到复用的目的,减少代码重复性

混合文件就是我们在构造vc的时候传入的配置项

只不过单独将其拿了出来

1
2
3
4
5
6
7
8
9
10
11
12
13
14
15
16
17
export const hooks = {
created(){
console.log('数据代理、数据劫持已完成')
},
mounted() {
console.log('挂载完成!')
}
}

export const getData = {
data() {
return {
x:100,
y:200
}
},
}

全局混入(全局配置):Vue.mixin(xxx)

局部混入(配置项):mixin: ['aaa']

注意点:

1
2
3
4
5
1、钩子以外的配置项
如果混合中有,则以配置项中优先级高
如果混合中没有,则整合进配置项中
2、将两者的生命周期组合在一起
先执行自己的钩子,然后执行mixin中的钩子

插件

我们在平时生活工作中,一款好用的插件可以极大地提高我们的生产效率,在Vue中也有这样的插件

我们来定义一个插件试一试

1
2
3
4
5
6
7
8
9
10
11
12
13
14
15
16
17
18
19
20
21
22
23
24
25
26
27
28
29
30
31
32
33
export default {
//...代表使用插件的时候传入的参数
install(Vue,...){
//全局过滤器
Vue.filter('filterName',function(value){
return ...
})

//定义全局指令
Vue.directive('directiveName',{
//指令与元素成功绑定时
bind(element,binding){
//...
},
//指令所在元素被插入页面时
inserted(element,binding){
//...
},
//指令所在的模板被重新解析时
update(element,binding){
//...
}
})

//定义混入
Vue.mixin({
//...
})

//给Vue原型上添加一个方法(vm和vc就都能用了)
Vue.prototype.hello = ()=>{alert('你好啊')}
}
}

在main.js中使用

1
2
3
import plugins from './plugins'

Vue.use(plugins)

style标签

scoped属性

1
2
3
4
<style scoped>
在这个里面写的css样式只会作用于该文件的结构
如果不加scoped则会作用于所有符合条件的html结构
</style>

lang属性

1
2
3
4
5
<style scoped lang="scss">
如果你想使用Less或者Scss来写css则需要下载编译工具
npm i less-loader
npm i scss-loader
</style>

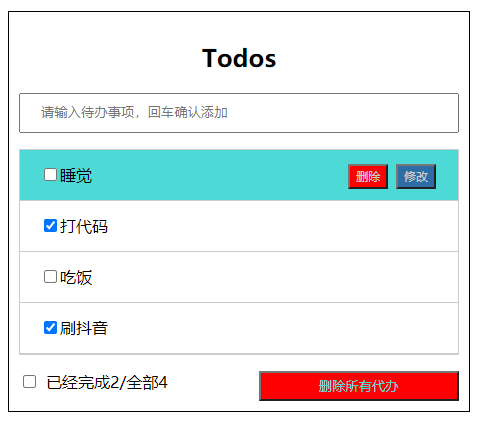
Todos案例

提前声明:此案例会循序渐进地讲到很多知识点,请务必不要跳过

静态页面代码

App.vue

1
2
3
4
5
6
7
8
9
10
11
12
13
14
15
16
17
18
19
20
21
22
23
24
25
26
27
28
29
30
31
32
33
34
35
36
37
38
39
40
41
42
43
44
45
46
47
48
49
50
51
52
53
54
55
56
57
58
59
60
61
62
63
64
65
66
67
68
69
70
71
72
73
74
75
76
77
78
79
80
81
82
83
84
85
86
87
88
89
90
91
92
93
94
95
96
97
98
99
100
101
102
103
104
<template>
<div class="container">
<div>
<h2 style="text-align: center">Todos</h2>
<input class="task" type="text" placeholder="请输入待办事项,回车确认添加" v-model="task">
</div>
<ul class="todos">
<li class="todo">
<div>
<input type="checkbox">
<span>敲代码</span>
</div>
<div class="buttons">
<button class="delete" @click="deleteSelf(todo.id)">删除</button>
<button class="update" @click="updateSelf(todo.id)">修改</button>
</div>
</li>
<li class="todo">
<div>
<input type="checkbox">
<span>睡觉</span>
</div>
<div class="buttons">
<button class="delete" @click="deleteSelf(todo.id)">删除</button>
<button class="update" @click="updateSelf(todo.id)">修改</button>
</div>
</li>
<li class="todo">
<div>
<input type="checkbox">
<span>吃饭</span>
</div>
<div class="buttons">
<button class="delete" @click="deleteSelf(todo.id)">删除</button>
<button class="update" @click="updateSelf(todo.id)">修改</button>
</div>
</li>
</ul>
<div class="footer">
<input type="checkbox" style="margin-right: 10px"><span>已经完成0/全部3</span>
</div>
</div>
</template>
<script>
export default {
name: 'App',
data(){
return {

}
},
}
</script>
<style scoped>
.todos {
list-style: none;
padding: 0;
border: 1px solid #ccc;
}
.todo {
height: 50px;
padding: 0 0 0 20px;
border-bottom: 1px solid #ccc;
display: flex;
align-items: center;
justify-content: space-between;
}
.task {
width: 100%;
height: 40px;
padding-left: 20px;
box-sizing: border-box
}
.container {
border: 1px solid black;
padding: 10px;
width: 30%;
margin: 40px auto
}
.buttons {
margin-right: 20px;
width: 20%;
display: none;
justify-content: space-between;
}
.todo:hover .buttons {
display: flex;
}
.todo:hover {
background: #4dd9d5;
}
.delete {
background: red;
color: #CCCCCC;
font-size: 10px;
cursor: pointer;
}
.update {
background: #2e6da4;
color: #CCCCCC;
font-size: 10px;
cursor: pointer;
}
</style>

动态数据

现在将数据放到data中,再补充一点逻辑吧

接下来就不写style标签啦

1
2
3
4
5
6
7
8
9
10
11
12
13
14
15
16
17
18
19
20
21
22
23
24
25
26
27
28
29
30
31
32
33
34
35
36
37
38
39
40
41
42
43
44
45
46
47
48
49
50
51
52
53
54
55
56
57
58
59
60
<template>
<div class="container">
<div>
<h2 style="text-align: center">Todos</h2>
<input class="task" type="text" placeholder="请输入待办事项,回车确认添加" v-model="task" @keydown.enter="insertNewTask">
</div>
<ul class="todos">
<li class="todo" v-for="todo in todos" :key="todo.id">
<div>
<input type="checkbox" v-model="todo.done">
<span>{{ todo.content }}</span>
</div>
<div class="buttons">
<button class="delete" @click="deleteSelf(todo.id)">删除</button>
<button class="update" @click="updateSelf(todo.id)">修改</button>
</div>
</li>
</ul>
<div class="footer">
<input type="checkbox" style="margin-right: 10px"><span>已经完成{{hasDone}}/全部{{totalSum}}</span>
</div>
</div>
</template>

<script>
export default {
name: 'App',
data(){
return {
task: '',
todos: [
{id: '002',content: '睡觉',done: true},
{id: '001',content: '打代码',done: true},
{id: '003',content: '吃饭',done: false},
{id: '004',content: '刷抖音',done: true},
],
hasDone: 0,
}
},
mounted() {
this.hasDone = this.todos.filter(t=>t.done).length;
},
methods:{
deleteSelf(id){

},
updateSelf(id){

},
insertNewTask(){

}
},
computed: {
totalSum(){
return this.todos.length;
}
}
}
</script>

抽离组件

App作为王者居然写了这么多结构代码,哪里有什么组件化的思想,所以我们抽离出一个个组件

Top.vue

1
2
3
4
5
6
7
8
9
10
11
12
13
14
15
16
17
18
19
20
21
22
23
24
25
26
27
28
29
30
31
<template>
<div>
<h2 style="text-align: center">Todos</h2>
<input class="task" type="text" placeholder="请输入待办事项,回车确认添加" v-model="task" @keydown.enter="insertNewTask">
</div>
</template>

<script>
export default {
name: "Top",
data(){
return {
task: '',
}
},
methods:{
insertNewTask(){

}
}
}
</script>

<style scoped>
.task {
width: 100%;
height: 40px;
padding-left: 20px;
box-sizing: border-box
}
</style>

ShowTodosContainer.vue

1
2
3
4
5
6
7
8
9
10
11
12
13
14
15
16
17
18
19
20
21
22
23
24
25
26
27
28
29
30
31
32
33
34
35
36
37
38
39
40
41
42
43
44
45
46
47
48
49
50
51
52
53
54
55
56
57
58
59
60
61
62
63
64
65
66
67
68
69
70
71
72
73
74
75
76
77
78
79
80
81
82
<template>
<ul class="todos">
<li class="todo" v-for="todo in todos" :key="todo.id" @click="choose(todo.id)">
<div>
<input type="checkbox" v-model="todo.done">
<span>{{ todo.content }}</span>
</div>
<div class="buttons">
<button class="delete" @click="deleteSelf(todo.id)">删除</button>
<button class="update" @click="updateSelf(todo.id)">修改</button>
</div>
</li>
</ul>
</template>

<script>
export default {
name: "ShowTodosContainer",
props: ['todos'],
data(){
return {
todos: this.todos
}
},
methods:{
deleteSelf(id){

},
updateSelf(id){

},
choose(id){
this.todos.forEach(t=>{
if(t.id===id){
t.done=!t.done;
}
})
},
}
}
</script>

<style scoped>
.todos {
list-style: none;
padding: 0;
border: 1px solid #ccc;
}
.todo {
height: 50px;
padding: 0 0 0 20px;
border-bottom: 1px solid #ccc;
display: flex;
align-items: center;
justify-content: space-between;
}
.buttons {
margin-right: 20px;
width: 20%;
display: none;
justify-content: space-between;
}
.todo:hover .buttons {
display: flex;
}
.todo:hover {
background: #4dd9d5;
}

.delete {
background: red;
color: #CCCCCC;
font-size: 10px;
cursor: pointer;
}
.update {
background: #2e6da4;
color: #CCCCCC;
font-size: 10px;
cursor: pointer;
}
</style>

这里补充一个知识点

1
2
3
4
5
6
对于<input type="checkbox">
1.没有配置input的value属性,那么收集的就是checked(勾选 or 未勾选,是布尔值)

2.配置input的value属性:
(1)v-model的初始值是非数组,那么收集的就是checked(勾选 or 未勾选,是布尔值)
(2)v-model的初始值是数组,那么收集的的就是value组成的数组

PageFooter.vue

1
2
3
4
5
6
7
8
9
10
11
12
13
14
15
16
17
18
19
20
21
22
23
24
25
26
27
28
29
30
31
32
33
34
35
36
37
38
39
40
41
42
43
44
45
46
47
48
49
50
51
52
<template>
<div class="footer">
<div>
<input type="checkbox" style="margin-right: 10px" v-model="allHasDone">
<span>已经完成{{hasDone}}/全部{{totalSum}}</span>
</div>
<button class="deleteAll" @click="deleteAllTodos">
删除所有代办
</button>
</div>
</template>

<script>
export default {
name: "PageFooter",
props: ['todos'],
data(){
return {
allHasDone: false
}
},
computed: {
totalSum(){
return this.todos.length;
},
hasDone(){
let length = this.todos.filter(t=>t.done).length;
this.allHasDone = length === this.todos.length;
return length;
},
},
methods: {
deleteAllTodos(){

}
}
}
</script>

<style scoped>
.footer {
display: flex;
justify-content: space-between;
}
.deleteAll {
background: red;
height: 30px;
width: 200px;
cursor:pointer;
color: #4dd9d5
}
</style>

实现所有功能

插入新代办
1
2
3
4
5
6
7
8
9
10
11
insertNewTask(){
if(this.task === ''){
return alert('请不要输入空的代办!')
}
this.todos.push({
id:nanoid(),
content: this.task,
hasDone: false
})
this.task=''
}
删除单个代办
1
2
3
deleteSelf(id){
this.todoList.splice(0,this.todoList.length,...this.todoList.filter(t=>t.id!==id));
},
删除所有代办
1
2
3
deleteAllTodos(){
this.todoList.splice(0,this.totalSum,...this.todoList.filter(t=>!t.done))
}
勾选
1
<input type="checkbox" style="margin-right: 10px" v-model="allHasDone" @click="chooseAll">
1
2
3
chooseAll(){
this.todoList.forEach(t=>t.done=!this.allHasDone);
}

注意点:先处理点击事件,然后数据才更新,所以要取反

更新代办

这个有点麻烦,需要再添加一个组件,使用动态样式来控制其显示

UpdateDialog.vue

1
2
3
4
5
6
7
8
9
10
11
12
13
14
15
16
17
18
19
20
21
22
23
24
25
26
27
28
29
30
31
32
33
34
35
36
37
38
39
40
41
42
43
44
45
46
47
48
49
50
51
52
53
54
55
56
57
58
59
60
61
62
63
64
65
66
67
68
69
70
71
<template>
<div class="dialog":class="{'clear':showDialog}" @click.self="close">
<div class="form">
<h2>请修改代办</h2>
<span class="close" @click="close">X</span>
<input type="text" v-model="updatedTaskContent">
<button style="margin-right: 20px" @click="updateTask">
修改
</button>
<button @click="close">
取消
</button>
</div>
</div>
</template>

<script>
export default {
name: "UpdateDialog",
props: ['task','showDialog'],
data(){
return {
updatedTaskContent: this.task.content,
propTask: this.task
}
},
methods:{
close(){
this.$emit('closeDialog')
},
updateTask(){
this.propTask.content=this.updatedTaskContent
}
}
}
</script>

<style scoped>
.dialog {
position: absolute;
display: none;
top: 0px;
bottom: 0;
left: 0px;
right: 0px;
background: rgba(0,0,0,0.2);
}
input {
width: 400px;
margin-bottom: 20px;
}
.form {
position: relative;
width: 30%;
height: 300px;
margin: 40px auto;
background: beige;
padding: 20px;
}
.close {
display: block;
position: absolute;
top: -10px;
right: 0px;
cursor: pointer;
}

.clear {
display: block;
}
</style>

这里使用的自定义事件

我在使用该组件的时候传入一个函数,然后组件内部就可以使用this.$emit('自定义事件名')来调用该事件

1
<UpdateDialog :showDialog="showUpdateDialog" :task="choosedTask" @closeDialog="closeDialog"/>

这个如果这样写会产生一个问题,就是我的task确实是动态传的,但是因为我可能会取消本次更新操作

所以我不可以这样写,这样写的话,取消按钮就是一个小丑

1
<input type="text" v-model="task.content">

所以就必须得先存一份传入的值是吧,所以就应该像我刚刚那么写

但是你会发现还是有问题,检查之后发现是我存储的数据是固定在第一次传入的数据,可是我什么时候改变data中的数据呢?

监视属性

我们监视一下task,当其发生了改变,将其覆盖data中的数据

1
2
3
4
5
6
watch:{
task(){
this.updatedTaskContent=this.task.content;
this.propTask = this.task;
}
}
使用v-if配合使用
1
2
3
4
<UpdateDialog v-if="JSON.stringify(choosedTask)!=='{}'"
:showDialog="showUpdateDialog"
:task="choosedTask"
@closeDialog="closeDialog"/>

如果使用这种方法的话,我在closeDialog中需要将choosedTask赋值为空对象

自动获取焦点
1
<input ref="input" type="text" v-model="updatedTaskContent" @keyup.enter="updateTask">

如果是监视属性实现的话

需要在监视方法中加入以下逻辑

1
2
3
4
5
6
7
8
task(){
this.updatedTaskContent=this.task.content;
this.propTask = this.task;
//当页面解析完成之后再执行回调函数
this.$nextTick(function (){
this.$refs.input.focus();
})
}

如果是v-if实现的话

需要再挂载的时候加入以下逻辑

1
2
3
4
5
6
mounted() {
this.$nextTick(function (){
console.log(this);
this.$refs.input.focus();
})
},
存储

在App中封装一个save函数,将其传递给子组件,在所有对数组造成更新的地方都使用this.$emit('save')调用该函数

1
2
3
save(){
sessionStorage.setItem("todos",JSON.stringify(this.todos))
}

自定义事件

这个是相对于js中内置事件(keyup、click等等)的存在

js内置事件是给HTML元素使用的

自定义事件是给组件用的

主要作用就是实现父子组件之间的通信

绑定事件

1
2
3
4
5
6
7
8
9
10
11
12
13
14
15
16
17
18
19
20
21
22
23
24
25
26
27
28
29
30
31
32
33
34
35
36
37
38
39
40
41
42
<template>
<div class="app">
<h1>学生姓名是:{{studentName}}</h1>

<!-- 通过父组件给子组件传递函数类型的props实现:子给父传递数据 -->
<Teacher :getSchoolName="getSchoolName"/>

<!-- 通过父组件给子组件绑定一个自定义事件实现:子给父传递数据 -->
<Student @getStudentName="getStudentName"/>
</div>
</template>

<script>
import Student from './components/Student'
import School from './components/School'

export default {
name:'App',
components:{School,Student},
data() {
return {
studentName:''
}
},
methods: {
getTeacherName(name){
console.log('App收到了学校名:',name)
},
getStudentName(name){
console.log('App收到了学生名:',name)
this.studentName = name
}
},
}
</script>

<style scoped>
.app{
background-color: gray;
padding: 5px;
}
</style>

绑定事件的另一种方式

1
2
3
mount(){
this.$refs.student.$on('getStudentName',this.getStudentName) //绑定自定义事件
}

触发事件

School.vue

1
2
3
4
5
6
7
8
9
10
11
12
13
14
15
16
17
18
19
20
21
22
23
24
25
26
27
28
29
30
31
32
<template>
<div class="school">
<h2>学校名称:{{name}}</h2>
<h2>学校地址:{{address}}</h2>
<button @click="sendSchoolName">把学校名给App</button>
</div>
</template>

<script>
export default {
name:'School',
props:['getSchoolName'],
data() {
return {
name:'尚硅谷',
address:'北京',
}
},
methods: {
sendSchoolName(){
this.getSchoolName(this.name)
}
},
}
</script>

<style scoped>
.school{
background-color: skyblue;
padding: 5px;
}
</style>

Student.vue

1
2
3
4
5
6
7
8
9
10
11
12
13
14
15
16
17
18
19
20
21
22
23
24
25
26
27
28
29
30
31
32
33
<template>
<div class="student">
<h2>学生姓名:{{name}}</h2>
<h2>学生性别:{{sex}}</h2>
<button @click="sendStudentlName">把学生名给App</button>
</div>
</template>

<script>
export default {
name:'Student',
data() {
return {
name:'张三',
sex:'男',
}
},
methods: {
sendStudentlName(){
//触发Student组件实例身上的getStudentName事件
this.$emit('getStudentName',this.name)
}
},
}
</script>

<style lang="less" scoped>
.student{
background-color: pink;
padding: 5px;
margin-top: 30px;
}
</style>

自定义事件的触发本质还是由html的原生事件触发后,我们自己决定触发哪一个自定义事件的

props实现和自定义事件实现的区别:props需要手动接收

解绑事件

1
this.$off('getStudentName') //解绑一个自定义事件

组件使用js原生事件

1
<Student ref="student" @click.native="show"/>

组件间通信

我们发现,组件之间的通信十分地重要,我们来理一理到现在我们学会了那些组件之间通信的方法,

1
2
3
1.props			===》适用于父给子传递数据和函数			===》特点:需要手动接收,并且传递地如果是数据则不能修改

2.自定义事件 ===》适用于子给父传递数据 ===》特点:使用$emit调用

我们发现如果两个兄弟之间想要通信

则只能将数据状态提升

将数据放到两者共同地父组件上面去

然后父组件使用上述方法向两者传递信息

如果嵌套层级比较多,则需要多次多层传递数据,会比较麻烦

难道就只能这样了吗?NO!接下来我会讲解三种强大的方法实现任意组件之间的通信

全局事件总线

全局事件总线其实十分简单,就是使用自定义事件来实现的

只不过我们事件全部绑定在vm对象上

安装全局事件总线
1
2
3
4
5
6
7
8
//创建vm
new Vue({
el:'#app',
render: h => h(App),
beforeCreate() {
Vue.prototype.$bus = this //安装全局事件总线
},
})

不是一定要叫$bus

绑定事件
1
2
3
this.$bus.$on('hello',(data)=>{
console.log('我是School组件,收到了数据',data)
})
触发事件
1
this.$bus.$emit('hello',this.name)
解绑事件

beforeDestroy钩子中,用$off去解绑当前组件所用到的事件。

1
2
3
beforeDestroy() {
this.$bus.$off('hello')
}
原理:

1、自定义事件

2、VueComponent.prototype.__proto__ === Vue.prototype

消息订阅与发布

消息发布与订阅是一种思想,具体实现有很多种,我们这里选用pubsub-js

1
npm i pubsub-js
订阅和取消订阅消息

即设置事件和回调

即需要数据的组件

1
2
3
4
5
6
7
8
9
mounted() {
this.pubId = pubsub.subscribe('hello',(msgName,data)=>{
console.log(this)
// console.log('有人发布了hello消息,hello消息的回调执行了',msgName,data)
})
},
beforeDestroy() {
pubsub.unsubscribe(this.pubId)
},
发布消息

即发送数据的组件

1
pubsub.publish('hello',666)

Vuex

它是专门在Vue中实现集中式状态管理的一个插件,对Vue应用中多个组件的共享状态进行集中式的管理,也是一种任意组件间通信的方式

状态其实指的就是数据

x是所有组件都需要使用的,所以我们将x存入Vuex中
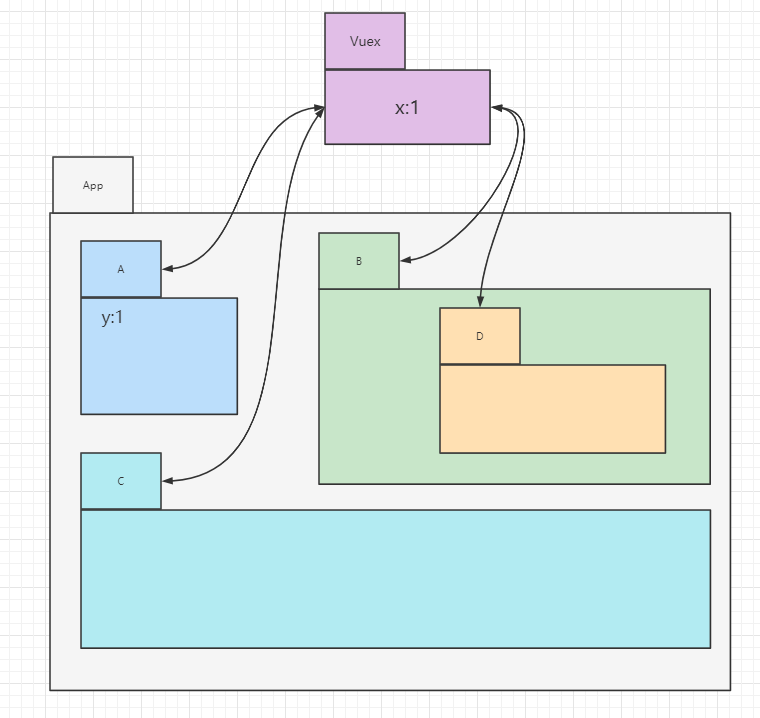
Vuex原理图
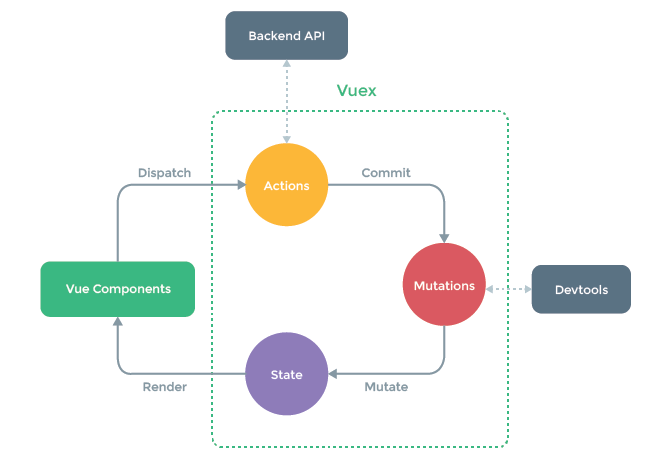
此图摘自官网

我们可以看到该图被虚线包起来的部分即Vuex的三大重要的工具,ActionsMutationsState

State译为状态,我们将需要共享的数据放入其中

Actions译为行为,我们会将对于数据的前置操作放入其中,比如条件判断,发出Ajax请求等

Mutations译为加工,我们真正对于数据的修改就是在这里进行的

Vue组件和Vuex工具之间的通信,有以下API,dispatchcommitmutaterender

只有dispatchcommit是我们手动调用的,其他两个都是由Vuex帮我们调用的,无需我们操心

dispatch是我们在组件内调用的,发出对数据操作的请求

commit是我们在actions或者Vue组件中调用的,让其对数据做出真正的改变

接下来我们直接使用案例来驱动

求和案例

效果图
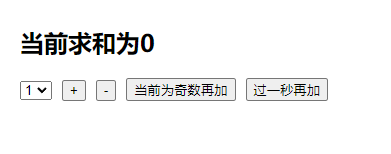
我们先将这个功能实现

因为还没有到组件共享的时候,所以现在先不使用Vuex

1
2
3
4
5
6
7
8
9
10
11
12
13
14
15
16
17
18
19
20
21
22
23
24
25
26
27
28
29
30
31
32
33
34
35
36
37
38
39
40
41
42
43
44
45
46
47
48
49
50
51
52
<template>
<div style="padding: 20px">
<h2>当前求和为{{sum}}</h2>
<div>
<select name="step" id="stepSelect" v-model="step">
<option :value="1">1</option>
<option :value="2">2</option>
<option :value="3">3</option>
</select>
<button @click="add">+</button>
<button @click="sub">-</button>
<button @click="addOnCondition">当前为奇数再加</button>
<button @click="addAfter">过一秒再加</button>
</div>
</div>
</template>

<script>
export default {
name: "Count",
data(){
return {
sum: 0,
step: 1
}
},
methods:{
add(){
this.sum+=this.step;
},
sub(){
this.sum-=this.step;
},
addOnCondition(){
if(this.sum % 2){
this.add();
}
},
addAfter(){
setTimeout(()=>{
this.add();
},1000);
},
}
}
</script>

<style scoped>
button {
margin-left: 10px;
}
</style>
准备

接下来我们做些使用Vuex前的准备

创建store/index.js文件

1
2
3
4
5
6
7
8
9
10
11
12
13
14
15
import Vuex from 'vuex'
import Vue from 'vue'
Vue.use(Vuex)

export default new Vuex.Store({
actions: {

},
mutations:{

},
state:{

},
})

main.js中引入该文件并并在创建vm的时候传入

1
2
3
4
5
6
7
8
9
import Vue from 'vue'
import App from './App.vue'
import store from "./store";
Vue.config.productionTip = false

new Vue({
render: h => h(App),
store
}).$mount('#app')
使用

接下来我们新建一个组件ShowSum组件,该组件的功能就是用来展示Count组件中的sum,现在我们就使用Vuex来实现此功能

先将数据都交给Vuex管理

Count.vue

1
2
3
4
5
6
7
8
9
10
11
12
13
14
15
16
17
18
19
20
21
22
23
24
25
26
27
28
29
30
31
32
33
34
35
36
37
38
39
40
41
42
43
44
45
46
47
<template>
<div style="padding: 20px">
<h2>当前求和为{{$store.state.sum}}</h2>
<div>
<select name="step" id="stepSelect" v-model="step">
<option :value="1">1</option>
<option :value="2">2</option>
<option :value="3">3</option>
</select>
<button @click="add">+</button>
<button @click="sub">-</button>
<button @click="addOnCondition">当前为奇数再加</button>
<button @click="addAfter">过一秒再加</button>
</div>
</div>
</template>

<script>
export default {
name: "Count",
data(){
return {
step: 1
}
},
methods:{
add(){
this.$store.dispatch('add',this.step);
},
sub(){
this.$store.dispatch('sub',this.step)
},
addOnCondition(){
this.$store.dispatch('addOnCondition',this.step)
},
addAfter(){
this.$store.dispatch('addAfter',this.step)
},
}
}
</script>

<style scoped>
button {
margin-left: 10px;
}
</style>

store/index.js

1
2
3
4
5
6
7
8
9
10
11
12
13
14
15
16
17
18
19
20
21
22
23
24
25
26
27
28
29
30
31
32
33
34
35
import Vuex from 'vuex'
import Vue from 'vue'
Vue.use(Vuex)

export default new Vuex.Store({
actions: {
add(context,value){
context.commit('INCREASE',value);
},
sub(context,value){
context.commit('DECREASE',value)
},
addOnCondition(context,value){
if(value%2!==0){
context.commit('INCREASE',value)
}
},
addAfter(context,value){
setTimeout(()=>{
context.commit('INCREASE',value)
},1000);
},
},
mutations:{
INCREASE(state,value){
state.sum+=value;
},
DECREASE(state,value){
state.sum-=value;
}
},
state:{
sum: 0,
},
})

ShowSum.vue

1
2
3
4
5
6
7
8
9
10
11
<template>
<div style="padding: 20px">
Count组件的sum值是:{{$store.state.sum}}
</div>
</template>

<script>
export default {
name: "ShowSum"
}
</script>

当我们想要拿到state中的数据的时候,需要使用$store.state.xxx,十分麻烦,所以Vuex就为我们提供了工具mapState

1
2
3
4
5
6
7
8
9
10
11
12
13
14
15
16
17
<template>
<div style="padding: 20px">
Count组件的sum值是:{{sum}}
</div>
</template>

<script>

import {mapState} from "vuex";

export default {
name: "ShowSum",
computed:{
...mapState(['sum'])
}
}
</script>
拓展

1、getters的使用

getters我们可以理解为计算属性,就是将state中的数据加工后返回给用户

1
2
3
4
5
6
7
8
9
10
11
12
13
14
15
16
17
18
19
20
import Vuex from 'vuex'
import Vue from 'vue'
Vue.use(Vuex)

export default new Vuex.Store({
actions: {

},
mutations:{

},
getters:{
bigSum(state){
return state.sum*10
}
},
state:{

},
})

2、mapGettersmapActionsmapMutations工具

我们对于state中的数据可以使用mapState来将其方便地从Vuex中拿出来

对于gettersactionsmutations中的方法和数据我们也有对应的工具将其从Vuex中拿出

3、模块化开发
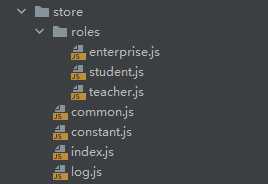
如果数据还有分类,我们就可以使用模块化开发

store/index.js

1
2
3
4
5
6
7
8
9
10
11
12
13
14
15
16
17
18
19
20
21
22
23
import Vue from 'vue'
import Vuex from 'vuex'
Vue.use(Vuex)

import teacher from "@/store/roles/teacher";
import student from "@/store/roles/student";
import enterprise from "@/store/roles/enterprise";
import log from '@/store/log'
import constant from "@/store/constant";
import common from "@/store/common";

const store = new Vuex.Store({
modules: {
log,
constant,
common,
teacher,
student,
enterprise
}
})

export default store;

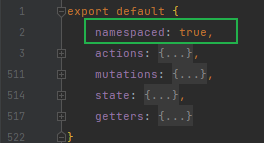
使用模块化开发要注意一个点,就是在各个文件中需要开启命名空间

采用模块化开发使用后,mapXXX工具的使用方法就发生了改变,改变如下

1
2
3
4
...mapState('模块名',['state参数名']),
...mapGetters('模块名',['getters参数名']),
...mapActions('模块名',['actions函数名']),
...mapMutations('模块名',['mutations函数名']),
给作者买杯咖啡吧~~~